A task is created to define work that needs to be done, to report the time spent working on it and to capture all incurred costs related to it. A task includes the list of all of its assignments as it can be assigned to one or more resources.
A single "Assignment" record is created per resource assigned to a task. Be careful not to confuse an "Assignment" with the "Task" itself. A task document can be created manually by navigating to the [Create] menu and selecting "Task", or it can be created using the Genius Planner Gantt chart. See "Planning" below.
Create a task
Typically a task is created using the Genius Planner Gantt chart tool. However, it is also possible to create a task "manually". In such case, if there is only one Gantt chart in the project, the new task will automatically be loaded in it. In the rare case where several Gantt charts have been created in the same project, the task can be loaded afterwards in the plan of your choice.
To create a new task:
From the [Projects] tab navigate to the "Task & plans" view. Click on "New task" in the contextual navigation menu.
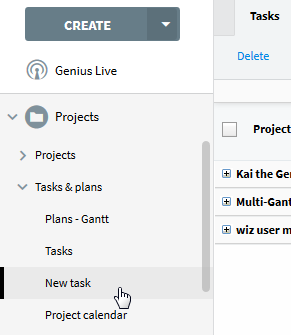
Alternate using [Create] Button "Task" to create new Task.

A dialog box will open asking you to select the project.

Note: A new task can also be created using the "Create" button on the action bar and selecting "Task".
Task header

Task | The task title. Mandatory. Not editable when the task is created from the planning tool. In this case, it is defined in the planning tool directly. |
Project | The project that the task belongs to. |
| This is the main identifier of the project. It can be the project name or name and code, depending on what has been defined in the General setup document of the [Projects] module. The project name and code are entered in the Project description document and are included in all of the project documents. The label is a link that opens the corresponding "Project description" document directly. |
Phase | The phase that the task belongs to. |
Project leader | The project’s main project leader (as opposed to the project leader substitutes) |
Status | Task status. The possible values are: Stand-by: The task is defined, but the work has not yet begun. No time can be entered for this status. Requested: Resources have been assigned to the task and the work on the task is scheduled to begin. Time can be entered. In progress: As soon as time has been entered for the task, its status automatically is changed to "In progress". To control: All assigned resources have completed their assignments and they have been submitted for approval. Time can still be entered in this status. Completed: All assigned resources have completed their assignments. Time can no longer be entered while in this status. Postponed: Rather an indication. Time can still be entered in this status. Cancelled: The task is cancelled. Time can no longer be entered while in this status. The default value depends on the option selected in the General setup document. It can either be "Stand-by", "Requested" or "In progress". Note: For tasks created from Genius Planner, the default value from the can be overridden by settings from the "Plan" document itself. |
Deadline | Visual indicators: Red, deadline passed. Orange, deadline will not be met according to remaining workload. Green, OK. |
Progress | Percentage of work done. |
Last modification | Date and time of the last modifications. By clicking on the date you can access the history of the modifications. |
Last Comment | Displays the last comments made on the task. You can reply directly to the comments by clicking on "Reply" and you can create a new discussion by clicking on "New discussion". See "Collaborate with Genius Live!" for more information. |
Defining and planning a task; task [Details] tab
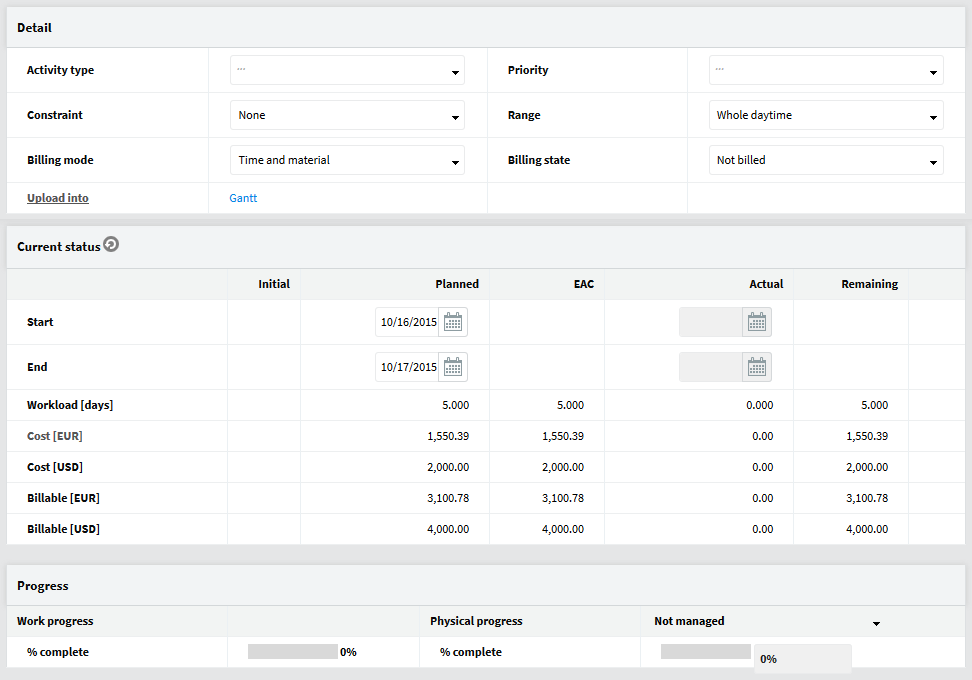
Detail |
Activity type | This field is used to categorize the task by the type of activity it represents (i.e.: administration, building, supervision, etc.). The list of choices comes from the Keywords & Labels setup document. This activity type can be used in two places: In the budget structure, if activity type is defined as a budget axis. (see: Budget management). In the case of multi-rates management, different rates can be attributed to the resources based on activity type. See: Budget & Cost Tracking for more information. |
Constraint | None: No specific constraint on the task. Unmovable: Tasks are labeled as unmovable so that in the availability documents, any percentage of work larger than 100% for a resource is shown as a conflict. A meeting, for example, should normally not be movable. This allows for enhanced conflict management in the availability calculation. Never delayed: The agent "Management of delayed documents" will not process that task. Useful for a recurrent task. |
Billing mode | The billing mode that applies to the task. Single selection field. Possible values are: Not billable: nothing is billed. Fixed price: the billing price is fixed in advance. It will be recorded through a Billing milestone. Time and material: the billing price is based on time spent working on the task. |
|
Plan | If the task was created from a plan or manually uploaded in a plan, the title of the plan is shown here. The field is a hyperlink that opens the corresponding "Plan" document. Otherwise, it displays the label "Upload into", and the field contents is "- Select a plan –", which is a shortcut allowing for the selection of the "Plan" document which the task should be uploaded into. |
Priority | The task priority (urgent, low, etc.). The list of choices comes from the "Keywords & Labels" setup document. |
Range | To indicate if a task must be done in the morning, the afternoon or the whole day. This is especially useful for the tasks which only last half a day, and allows for more exact availability management (at half-day level). |
Billing state | Not visible if "Billing mode" is set to "Not billable". To indicate if the task is already billed or not. Single selection field. Possible values are: Billed. Not billed. Partly billed. |
Current status |
Start | Initial: The initial planned start date of the task. Only available if the task is uploaded in a Genius Planner plan. Planned: The actual planned start date of the task. The default planned start date is the creation date. Mandatory. Not editable when the task is created from a planning tool. In this case, it is defined in the planning tool directly. Actual: The value comes from time posted to the task by the assigned resources in their timesheets or in the "Assignment" documents directly. It is editable only if the status is "In progress" and the option "Possibility to modify the actual dates of the tasks" of the "General" setup document is not set to "No". If the option "Possibility to modify the actual dates of the tasks" in the "General" setup document is set to "Yes", it is automatically set to the current date when the status of the task is set to "In progress". If the option "Possibility to modify the actual dates of the tasks" of the "General" setup document is set to "Manual", then the field just becomes editable when the status of the task is set to "In progress". |
End | Initial: The initial planned end date of the task. Only available if the task is uploaded in a Genius Planner plan. Planned: The planned end date of the task. The default planned end date is one day after the creation date. Mandatory. Not editable when the task is created from a planning tool. In this case, it is defined from the planning tool directly. Actual: The value comes from time posted to the task by the assigned resources in their timesheets or in the "Assignment" documents directly once all of the task’s assignments have been completed. It is editable only if the status is "To control" or "Completed" and the option "Possibility to modify the actual dates of the tasks" in the "General" setup document is NOT set to "No". If the option "Possibility to modify the actual dates of the tasks" of the "General" setup document is set to "Yes", it is automatically set to the date when the status of the task is set to "To control" or "Completed". If the option "Possibility to modify the actual dates of the tasks" in the "General" setup document is set to "Manual", then the field just becomes editable when the status of the task is set to "To control" or "Completed". No date is computed. |
|
Workload | Indicates the total initial, planned, actual, remaining and EAC (Estimate At Completion) workload. The workload unit is specified in the "General" setup document. Computed. This is the sum of all assignments. If the planned work is "0", the remaining work is always equal to "0". |
Costs | Indicates the initial, planned, actual, remaining and EAC (Estimate at Completion) costs. The cost is calculated automatically. It is composed of the sum of the costs for each resource assigned to the task, where the cost is obtained by multiplying the resource's rates by her/his workload. See Budget & Cost Tracking for more information. These fields are displayed in either of these cases: The user belongs to the project team and has the "View Costs" role. The user is NOT part of the resources excluded from seeing financial information, as set in the "General" setup document. The user is an application manager (i.e. has the "COP_MANAGERS" role). The label is a shortcut opening a window showing all costs in all available currencies defined in the "Other currencies" field of the "General" setup document. |
Billable | Only visible if "Billing mode" is set to "Time spent". Indicates the initial, planned, actual, remaining and EAC (Estimate at Completion) billable cost. The cost is calculated automatically. It is composed of the sum of the costs for each resource assigned to the task, where the cost is obtained by multiplying the resource's rates by her/his workload. |
Progress | Work progress, % completed |
Indicates the task's progress. This percentage is automatically calculated based on the time entered in the assignments. |
Physical progress | Used to indicate whether physical progress will be tracked for the task. The default value comes from the Project description but can be changed on a per task basis. Click on the option to change it. Possible choices are: Not managed: physical progress cannot be tracked for the task. Used for the earned value calculation: physical progress can be tracked for the task and will be used for the earned value calculation in the "Project overview" documents. Entered but not used: the physical progress can be tracked for the tasks, but it will only be displayed in the views and will not be used for earned value calculation. |
Physical progress, % completed |
Indicates the physical progress of the task. Not editable if the option "Physical progress" is set to "Not managed". |
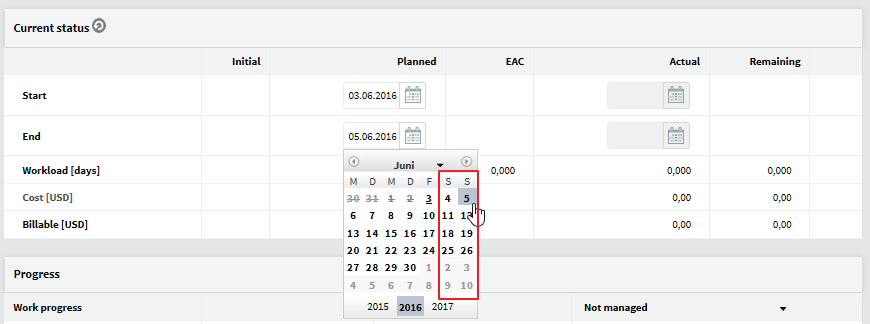
If the Start or End date belongs to the Weekend, the Task gets automatically the option "Enable on Weekend"
Note: The update of the physical progress does not update the status of the task. Unlike time recording, that updates task status, physical progress does not. In order to ensure consistency with the update process, physical progress can only be inputted for tasks status "in Progress," or "To Control".
Note: The Flag "unmovable" for the Field "Constraint" is outdated. It was used by P4D, never transported to the Web.
Assign and change resource assignments for a task ; Task [Resource] tab
Resources assignments are displayed in a list.
Assignments cannot be added, modified or deleted if the task:
Was created within a Gantt chart. In this case, the assignments are defined directly in the Gantt chart.
Status is "Completed". Status is "Cancelled".
Is "Not assigned" and has actual work.

Grid buttons |

| To add a new line and resource to the grid. Appears only if task is not created using Genius Planner Gantt chart. |

| To remove a selected line or resource from the grid. Appears only if task is not created using Genius Planner Gantt chart. |

| To view rates assigned to each resource on the task. |
Grid |
Assignmen t | Select the resource you want to assign from the dropdown list box. Note: As long no actual time has been reported for the assignment, you can easily change the assigned resource. |
Green: The assignment is completed or on time. Yellow: Risk of delay. Red: delay. |
Planned | Planned workload for the assigned resource. |
| Actual | Actual workload for the assigned resource. See "update task progress" to know how to change this value. |
Remaining | Remaining workload for the assigned resource. |
Describe what has to be done, [Description] tab
Used to describe the task; what needs to be done. If the task was created by Gantt, this field can only be edited in the Gantt Chart.

If Task was created using context menu, first time description can been used.

Add additional information necessary to complete the task description, [Additional information] tab
This is where you can add more information about the task. The difference from the "Description" field is that it can be edited by the owner (requester) of the task, the project manager and also by any resources assigned to the task.

Collaborate on the task, [Genius Live!] tab
The [Genius Live!] tab provides a complete history of collaboration, modifications, approvals and revisions of the task. For more information, please see the chapter Genius Live! Social collaboration
Attach files to a task. The [Attachment] tab
This section allows for the attachment of external files. See Manage attached files in the document management section for more details.
Users can attach files to the task form to store any additional information pertaining to it. It is however recommended to store each significant file attachment as single document in Geniusproject.
This will allow users to distribute, publish, or manage access rights for any particular attached file independently.

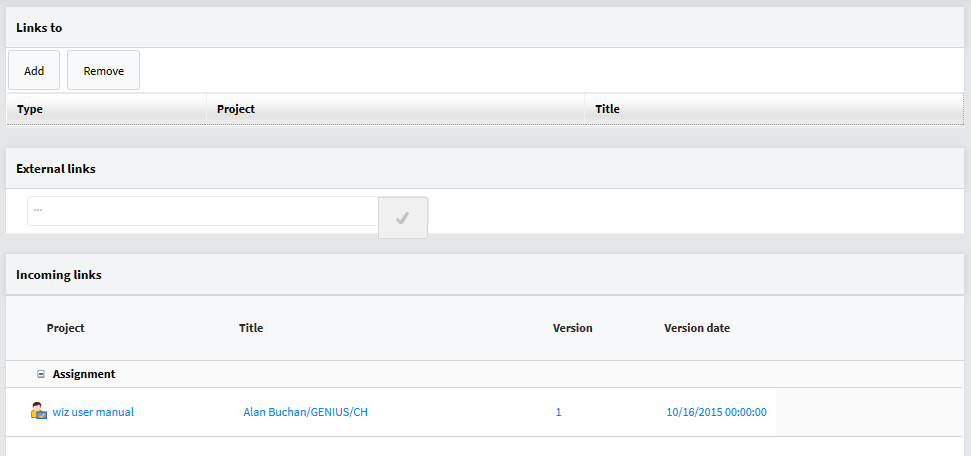
The "linked documents" tab
On this tab are all of the links the task has to other documents that are part of the project. Geniusproject offers the ability to save links between related project documents. For more information on this topic see the chapter Managing Links between documents.
Delete a task
There are three possible ways to delete a task:
Directly in Genius Planner if the task was created or uploaded into a Gantt Chart. Directly from the task document. Click "Delete" on the menu action bar.
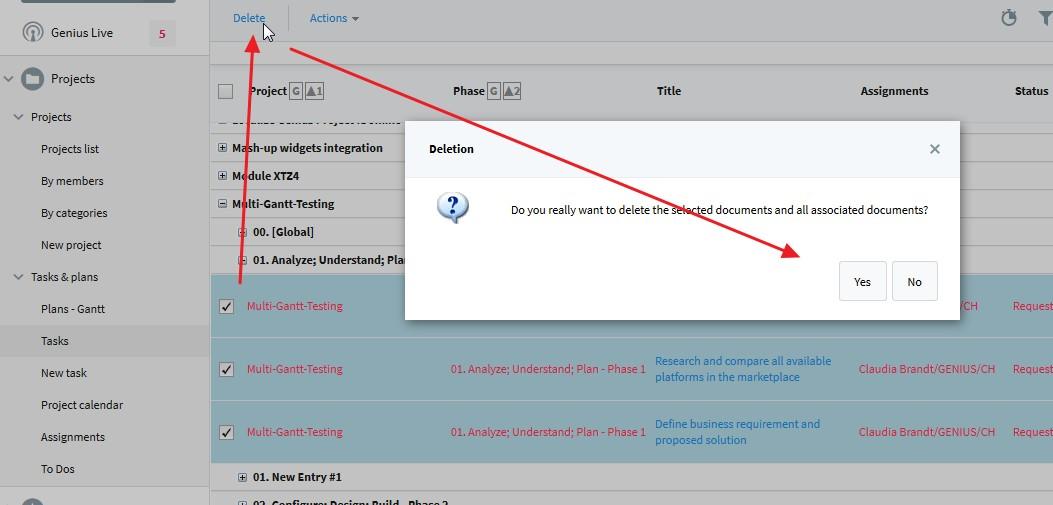
From a view. Select the task(s) to be deleted and click "Delete" on the view menu action bar.
Modify multiple tasks at once (Bulk Edit)
In order to avoid repetitive actions, Geniusproject allows users to update certain values for multiple tasks at once. The values that can be updated in bulk are:
Status Activity type Constraint Requester Priority
In order to do so:
Select the tasks to be updated from the view.
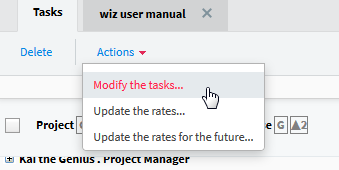
Click on the [Actions] menu on the action menu bar and select "Modify the tasks…".
A dialogue box will open.

Select the field to modify. Select the new value.
Click OK