Create Custom Fields (v8.xx)
It is possible to customize Geniusproject with simple setup actions, to add fields and to create reports based on those fields. You need [Admin] access to do this.
Custom fields can be defined for any Geniusproject form as well "generic documents." The custom fields will be displayed in the "Customization" tab the corresponding forms. Custom fields are available in the Portfolio, Project and Resources databases.
You need Admin rights in order to create custom fields. Let’s take an example where we wants to add some information on any cost tracked in Geniusproject. We want to know if the cost was budgeted; if it is a one time or recurring fee; and some supplier information.
Access the admin module of the database you would like to add some custom fields
In the [Setup] tab, select the option "Additional fields" in the navigation contextual menu. Select the option [Create-Additional Fields] the action bar menu.
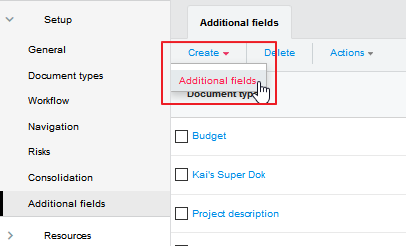
The form to define additional fields is displayed. The first thing to do is to specify for which forms, generic document or document template you want to add fields. For our example, we will choose "Cost."

Click on the icon to add a new field.
For each new field, define the Name, the Label, the type of filed, the corresponding option, the font size to be used to display the field and specify if the field should be mandatory.

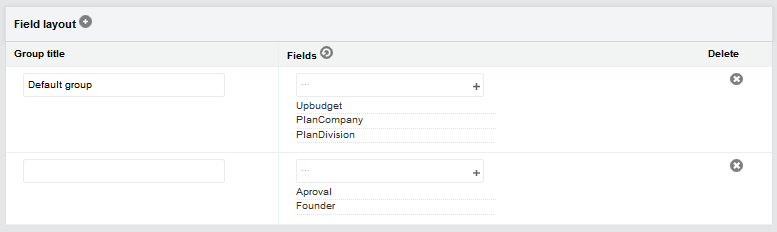
It is also possible to group fields for an improved layout of the form display. Let’s create two groups, one for Cost information and a second one to group supplier information.
In the fields layout section click on the icon to add a new group. Enter a "Group title," the label of the group.
Select which fields should be part of the group.
Repeat this action for each group definition
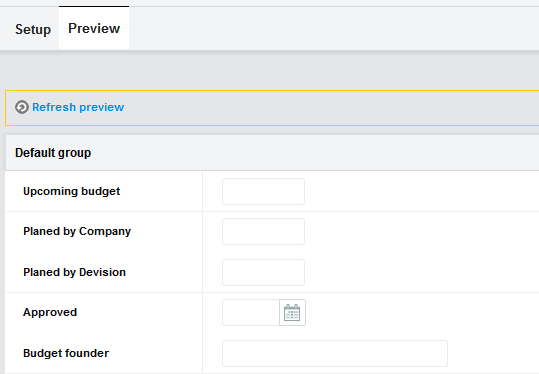
Test the results of the additional field definition directly from the setup form. Go to the [Preview] tab of the "Additional fields" definition form, and see the results. If necessary press the « refresh preview » .
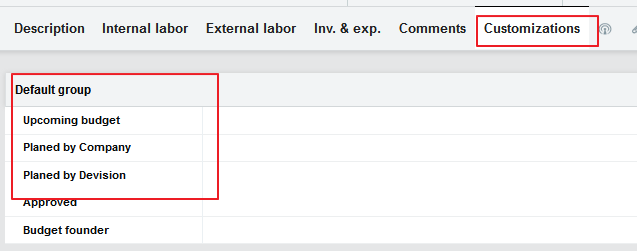
As a final test, create a new cost and check the contents of the [Customization tab].
Additional fields for Custom Documents (generic documents) will displayed directly above the Comment Box in the Content Tab.

New added fields are also directly available in the configurable views for reporting purposes.

Related Articles
Create Custom Fields (v10.xx)
Cerri Project can be customized through simple setup actions, allowing administrators to add custom fields and generate reports based on them. [Admin] access is required for this functionality. Custom fields can be defined for any Cerri Project form, ...Create Workflow Actions (v8.xx)
In addition to creating the different statuses, it is also possible to create a series of actions to be triggered whenever a document enters, leaves or is saved in a new status. To define an action and all of its parameters: Navigate to the [Setup & ...Create Workflow Actions (v10.xx)
In addition to creating different statuses, it is also possible to define a series of actions that will be triggered whenever a document enters, leaves, or is saved in a specific status. To define an action and its parameters: Navigate to the [Setup ...Create a Project Request (v10.xx)
To create a new project request: Navigate to the [Project requests] tab on the Module navigation menu. Select "All" from the contextual navigation menu. From the CREATE menu select "Project request". A new Project Request form will open. Header ...Create a Project Request (v8.xx)
To create a new project request: Navigate to the [Project requests] tab on the Module navigation menu. Select "New request" from the contextual navigation menu. Otherwise select "Project request" from Create Tab. A new Project Request form will open. ...