Create a Timesheet (v8.xx
Timesheets can be automatically created by the server at the beginning of each week. In this case, the timesheet will be automatically populated with a resource’s assignments for the upcoming week. Automatic generation of timesheets can only be enabled by the application Administrator.
To create a new timesheets:
Navigate to the [My workspace] tab.
Select "My timesheets" from the contextual navigation menu. Click "New timesheet".
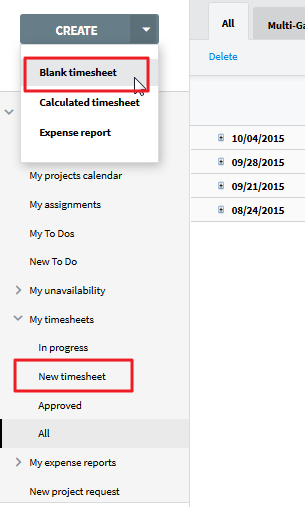
A new blank timesheet will be created.
There is a second way to create a new timesheet:
Navigate to the [Timesheets] tab, "Timesheets" view.
Click "Create" and select "Blank timesheet" or "Calculated timesheet". Choosing "Blank timesheet" will create a new blank timesheet.
Choosing, "Calculated timesheet" will open a dialogue box.
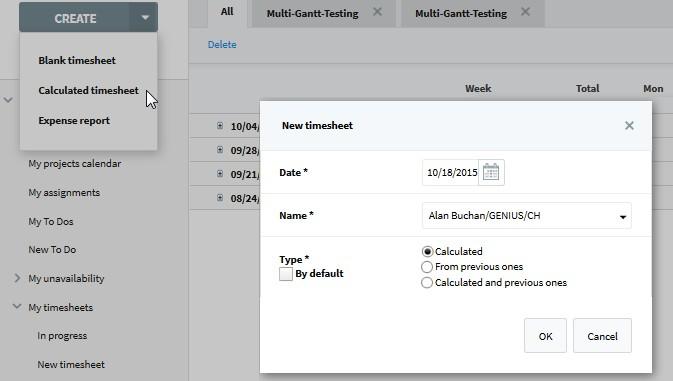
Date: Specify which week this new timesheet is for. Name: Which resource this timesheet is for.
Note: Time can be entered on behalf of another resource whose name would be entered here.
Type: Three possible options:
Calculated: Geniusproject looks for late tasks or tasks to be started during the current week.
From previous ones: Geniusproject analyzes timesheets from recent past weeks and retrieves tasks not completed and that have been marked to carry over to following weeks, and adds them to the new timesheet. If a user does not want to create a timesheet from the recent past weeks, but rather from an older week, see the option to copy a timesheet below.
A combination of the 2 options above.
Select "By default" for the system to remember this option.
Automatic generation of timesheets
The Notes Admin can enable the "Automatic generation of timesheets". All users get new Timesheets for the current week, e.g. Monday early Morning.

If a user gets no timesheet, please check the following bullets:
The resource is not published in the Timesheets database. The resource is not a member of any active projects.
The resource is a member of active projects, but is not assigned to any task.
If the user is only Member of a administrative Project. And if the Project has "open Tasks" (nobody is assigned an the task is "in progress"), the Member can report time.
Note: If the user did create a timesheet with at least one line in it, even a [Not assigned] tasks "In progress", next week a timesheet should be generated.
Timesheet header

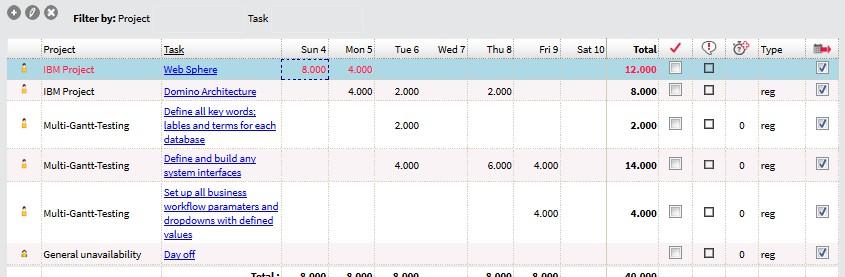
Posting time in the Timesheet
Time entry in the timesheet is done in a grid like fashion with one line per task, in theory. If different types of charges are required for the same task, within the same week, it is possible to have multiple lines for it. For example - billable hours and non-billable hours.
Related Articles
Create a Timesheet (v10.xx)
Timesheets can be automatically created by the server at the beginning of each week. In this case, the timesheet will be automatically populated with a resource’s assignments for the upcoming week. Automatic generation of timesheets can only be ...Timesheet Approvals (v10.xx)
Cerri Project allows for timesheets to be submited and approved once they have been completed in the [Timesheets] module. If the approval workflow is not enabled, users will mark their timesheets as complete directly. The update of assignments in the ...Timesheet Approvals (v8.xx)
An approval cycle can be enabled that requires users to submit their timesheets for approval once they have been completed in the [Timesheets] module. If the approval workflow is not enabled, users will mark their timesheets complete directly. The ...Delete a Timesheet (v10.xx)
As long as a timesheet has not been approved or submitted for approval, it can still be modifed. However, an administrator has the ability to delete a timesheet at any time. To delete a timesheet: From the [My workspace] tab, navigate to the "My ...Editing a Timesheet (v8.xx)
As long as a timesheet has not yet been approved or is not waiting to be approved, it can still be modified. To modify a timesheet: Navigate to the [My workspace] tab Select "My timesheets" from the contextual navigation menu Click "In Progress" and ...